How to use Trello to run an automated email-based sales demo at an in-person event

Paper flyers and brochures quickly get binned or forgotten at trade shows and conferences. Here's how to run a fully-digital sales demo at your next event with Email for Trello.
Preparing for an event? Skip the fuss of physical flyers, brochures, and printed collateral! Turn your Trello board into a live, digital demo tool that captures leads and responds automatically – no extra tools needed.
With the Email for Trello Power-Up, you can run a paperless, automated sales workflow right from your event booth. Collect email addresses for potential customers, automatically email them right away with information about your business, and set post-event follow-up emails to go out to every prospect. Perfect for in-person events like trade shows and conferences, a digital sales demo helps your team:
Stand out. Don’t get lost in the post-conference noise! Make the most of customer interest by sending information about your product or service via email – while they’re still right there at your stand.
Go paperless. Paper flyers and brochures quickly get binned or forgotten. Sending an on-the-spot email is easy, memorable, and convenient for your lead to refer back to later.
Customize your messaging. With printed media, it’s more cost-effective to choose one marketing message and stick to it. Not so with digital! Make the most of an email demo to tailor your sales efforts to as many different customer groups as you need, and send information that’s relevant to them.
How to set up an automated email-based sales demo in Trello
Let’s take a closer look at how to collect details for people coming to your event stand – and then send them information based on the details that they shared. We’ll use our own Email for Trello Power-Up demo as an example.
Here’s an overview of how the three main elements of the system work together:
Lead capture form. Your prospects input their details on a web-based form.
Trello board. When your prospect hits ‘send’ on your form, each new email submission appears as a new card on your sales demo board in Trello.
Trello automation. Once you have each prospect as a Trello card, you can use automation to:
Move content from the form submission into Trello Custom Fields so that you can use these values to send relevant, targeted messages to your leads.
Send emails to inbound prospects using Saved Reply email templates tailored to each persona or use case you’re trying to reach.
Set up Trello card buttons to help you manage outlier scenarios, like offering a voucher or free product to a subset of leads.
First, we’ll look at how to capture leads and send them an automated email. Then, we’ll explore ways to build on this with post-event follow-ups, by running a giveaway, or with a special offer to a subset of leads.
1. Use a form to gather lead details
Easily gather details by having leads use a QR code to navigate to, and complete, a simple digital form. For example, the Email for Trello demo form collected customer first and last name, email address, and the primary use case they intend to use the Power-Up for.
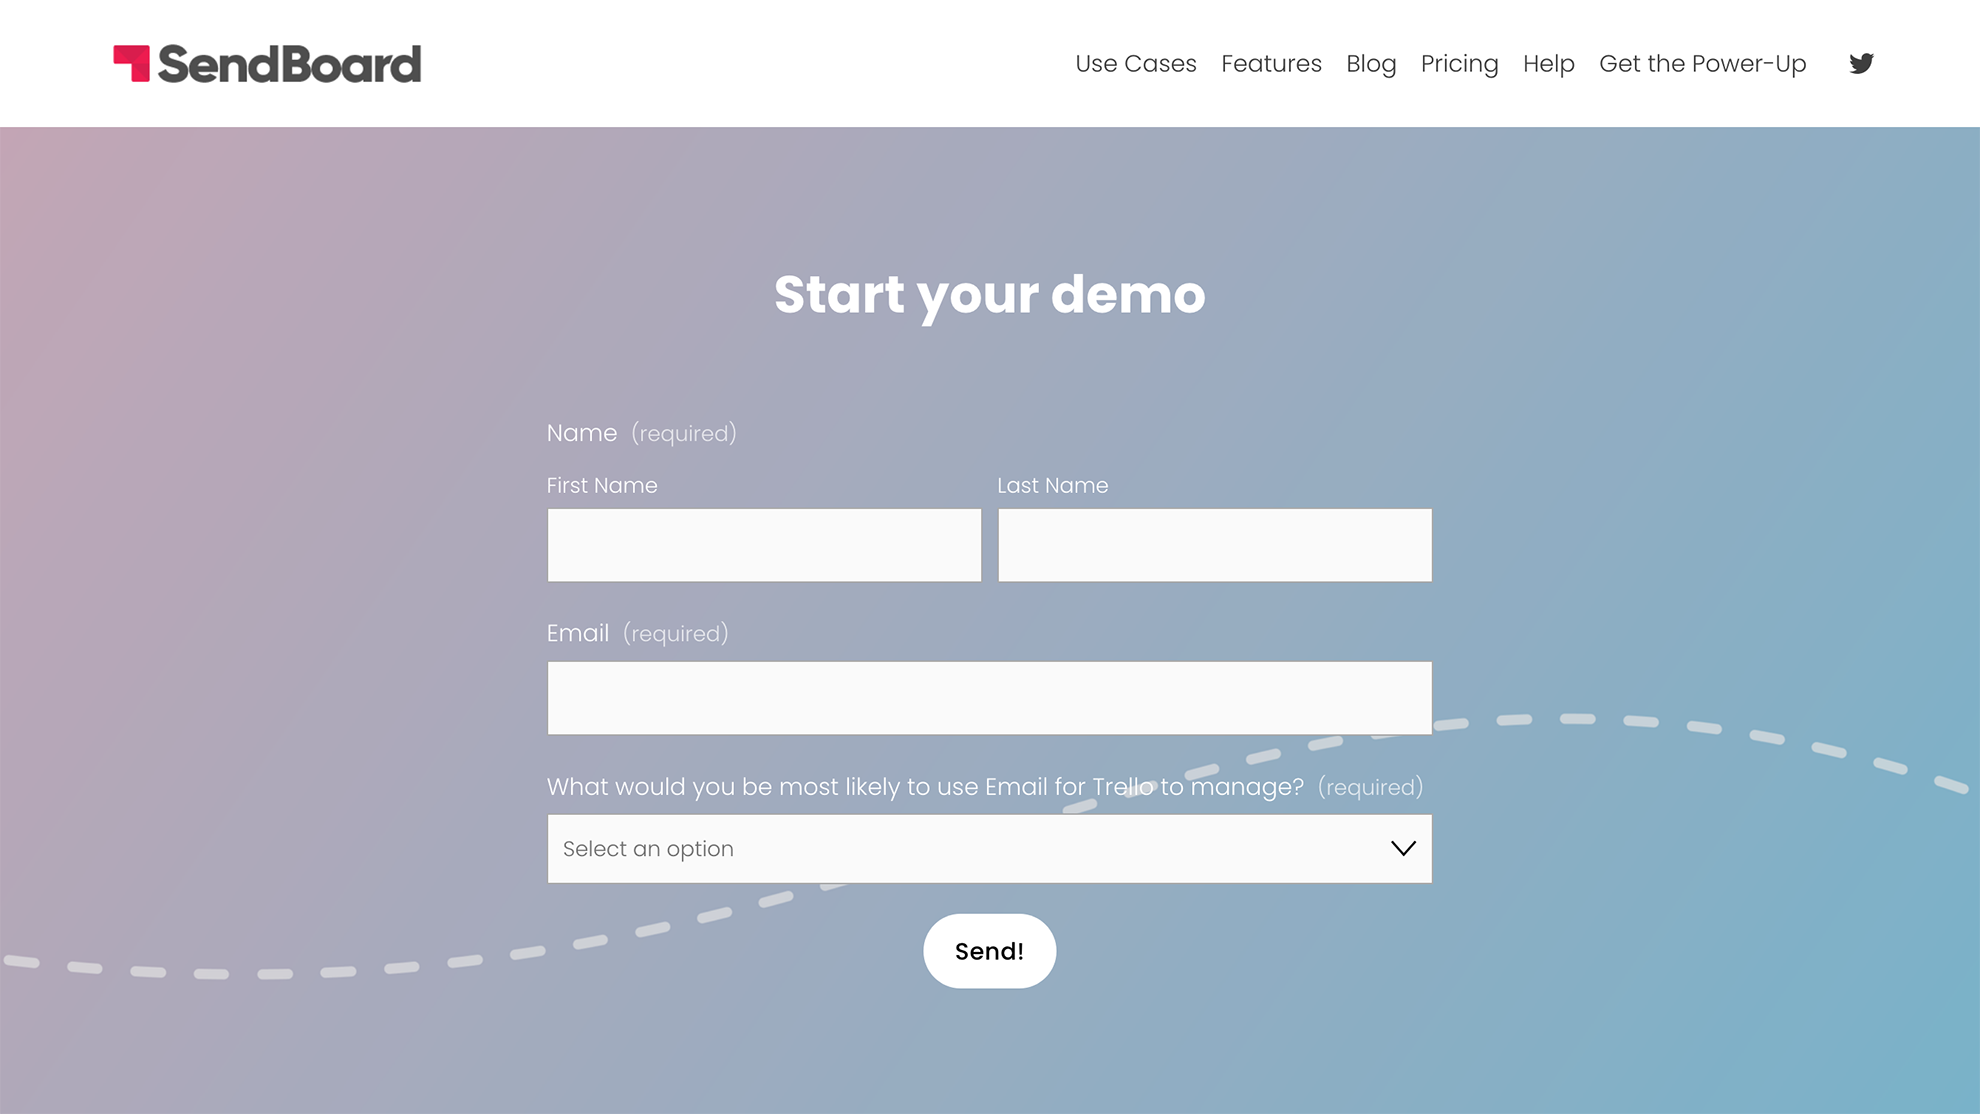
When your lead scans the QR code, they are directed to your form URL to fill in the form and start the demo.
💡 TIP Connect a contact form to Trello with our step-by-step guide for Wufoo, Squarespace, Gravity Forms or Typeform. If you prefer, you can also connect Google Forms to Trello using Zapier.
This way, when people come over to your stand, instead of writing down their email (which your team would have to process later manually anyway), potential customers can put their details straight into the system – and get sent relevant info automatically and immediately!
2. Send an info pack via email when the form is filled, or a follow-up later on
To automatically send your lead an email after the form is complete, you need two things:
A Saved Reply. This is the template email that you want to send to customers after they give you their details. In our example, this is a Power-Up information overview email that potential customers can refer back to after the event.
Three Trello automation rules. Set up Trello automation rules to (1) capture an incoming form response, (2) set Trello Custom Fields for your lead’s name and email address, so that you can personalize your interactions with them, and (3) send your lead an email.
Set up your Saved Replies
Create the template email(s) that you want leads to receive as part of your in-person sales demo.
These might include:
An initial overview and call-to-action as part of a first interaction
A follow-up email post event
A special offer email that is sent to a subset of leads who meet certain criteria
As an example, here’s our first email, including an overview of our Power-Up and call to action.

The Saved Reply template for the Email for Trello Power-Up demo. Use variables to personalize your email and address leads by name. Each variable will be replaced by their relevant value when an email is sent.
Take a look at our help center for more on how to set up and use Saved Replies.
💡 TIP No one likes carrying around physical collateral at an event! Use your template email to share useful links with interested customers, like demo videos, flyers, info sheets or landing pages.
Automate your email response
1. Post the contents of the email to the card description
First up, we need to be able to get specific details out of the form email that the customer has sent. To do this, create a Trello automation to save the contents of the email (i.e. the form containing your customer’s name, email address and use case) to the Trello card description.
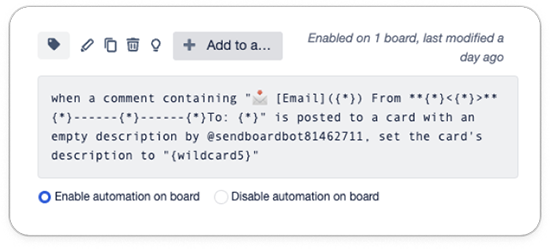
When a comment containing “📩 [Email] ({*}) From **{*}<{*}>**{*}———-{*}———-{*}To: {*}” is posted to a card with an empty description by @sendboardbot, set the card’s description to “{wildcard5}”
This automation relies on pattern matching and wildcards, which can look a little confusing at first. But essentially: because all Email for Trello emails are added as card comments by the SendBoard bot, Trello automation can access the email content through the pattern or structure of the comment.
We have a more detailed article in our help center that takes you through how to save email details to Trello using pattern matching and wildcards.
2. Set the ‘name’ and ‘email’ Custom Fields for personalization
Next, we set up automation rules to extract each customer’s name and email address into Custom Fields on the Trello card.
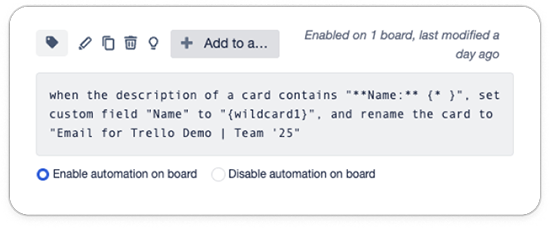
When the description of a card contains “**Name:** {* }”, set custom field “Name” to “{wildcard1}”, and rename the card to “Email for Trello Demo | Team ’25”
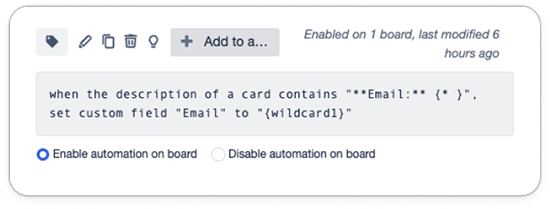
When the description of a card contains “**Email:** {* }”, set custom field “Email” to “{wildcard1}”
Then we did the same for each use case, too. For example:
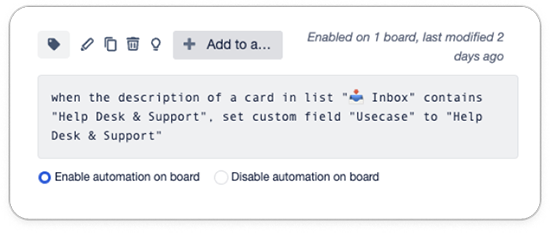
When the description of a card in list “📥 Inbox” contains “Help Desk & Support”, set custom field “Usecase” to “Help Desk & Support”
💡 TIP These rules also use wildcards, which you can read up about in our help center.
3. Send your first email
Now it’s time to send the demo email! When the Custom Fields in the previous step are completed, the following automation is triggered, and one of your Saved Reply template emails is sent (in this case “##demoemail1”).
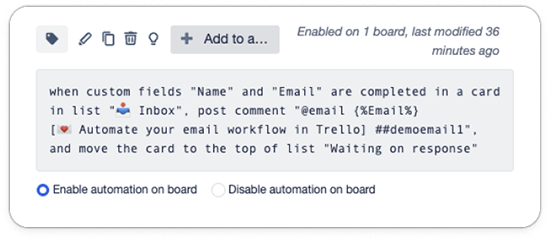
When custom fields “Name” and “Email” are completed in a card in list “📥 Inbox”, post comment “@email {%Email%} [💌 Automate your email workflow in Trello] ##demoemail1”, and move the card to the top of list “Waiting on response”
Let’s break down the elements of the automation:
@email is a special keyword that Email for Trello uses to make it possible to send an email using a Trello comment.
{%Email%} is the variable that represents your customer’s email address. Read more about email variables in our help center.
The [text in brackets] sets the subject line of your email.
##demoemail1 is the Saved Reply keyword that tells the Trello automation which template email to send.
As soon as you receive your lead’s form response to your Trello board, automation will take over and your potential customer will receive their personalized email!
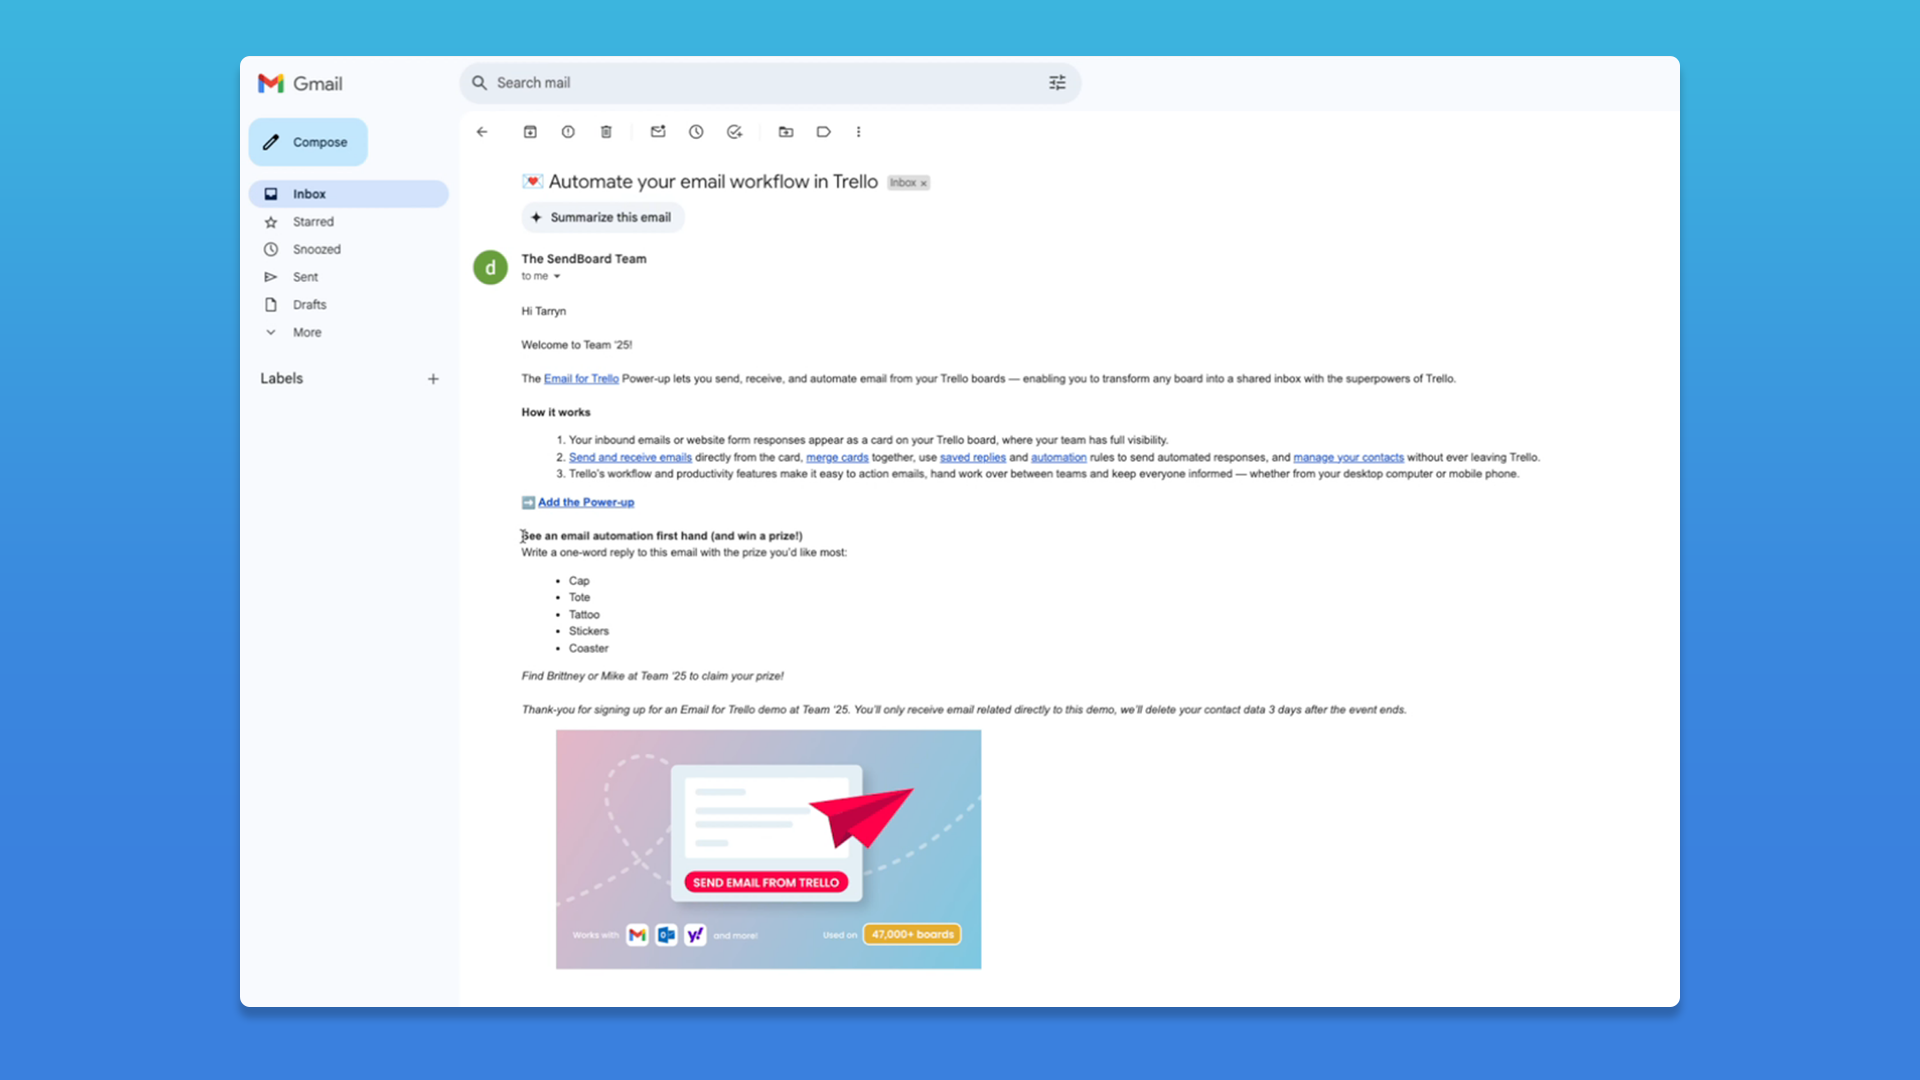
You’ve got mail! After submitting the form, each lead receives an email with a product overview that they can refer back to later.
Tailor your demo to suit your business
That’s the foundation of the email demo, but there are options for further customization to suit your business.
Run a prize giveaway
Run a fun engagement activity to give prizes to people attending your stand at an event!
For example, for our demo at Team ’25 we included a list of prizes in our Saved Reply. So if leads wanted to receive a prize, all they had to do was reply to the email with their preferred item (i.e. cap, tote bag, stickers).
We then used Trello automation to save each lead’s chosen prize to a Custom Field on the card, and move the card into the ‘Prize Winners’ list.
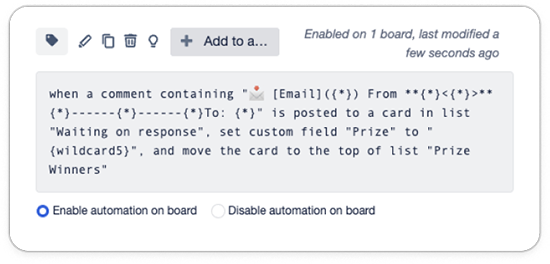
When a comment containing “📩 [Email] ({*}) From **{*}<{*}>**{*}———-{*}———-{*}To: {*}” is posted in list “Waiting on response”, set custom field “Prize” to “{wildcard5}”, and move the card to the top of list “Prize Winners”
It’s a really fun way to host a giveaway and encourage in-person engagement with your demo!
💡 TIP Keep track of the prizes you have given out by adding a ‘Prize Received’ Custom Field checkbox.
This automation can also be used to send specific email responses based on keywords in an email. For example, if you want to send tailored information to potential customers based on their use case, your automated email can ask leads to reply with a certain keyword (i.e. ‘marketing’ or ‘project management’) – and then send them information based on their response.
Automate post-event follow up emails
Stay top of mind after your event with automated follow up emails.
There are two main parts to this automation:
Set a due date on the card (in our example, this is for a set date after our event)
Send a Saved Reply when the card becomes due
For example, if you’ve used the previous step to give out a prize, you can use this as a trigger to move the card to a new list, and set the due date.
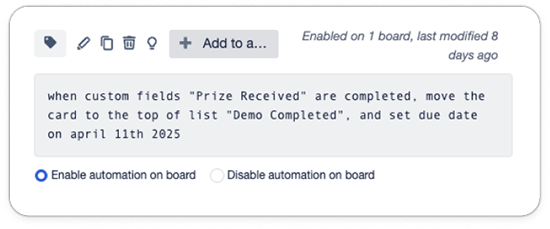
When custom field “Prize Received” is completed, move the card to the top of list “Demo Completed”, and set due date
Then set up a second automation to send your follow up email once the card is due.
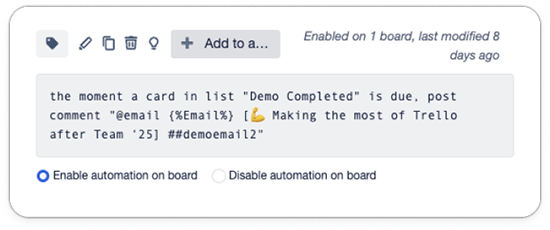
The moment a card in list “Demo Completed” is due, post comment “@email {%Email%} [💪 Making the most of Trello after Team ’25] ##demoemail2
Find out more about how to send timed follow up emails from Trello.
Send special offers to certain leads
Empower your team to send special offers to a subset of leads via email with button automations.
For example, let’s say you want to offer a special discount to certain leads (like event speakers, conference delegates, or industry thought leaders).
In the Trello Automation dropdown, select Buttons, then create a Card Button. Give your button a title and select an icon. Next, add actions to your button. For example:
Add a label to help you easily identify the leads you’ve sent the offer to (for example, we used the blue label for ‘Community Leaders’).
Send an email with your special offer.

Add the blue label to the card, and post comment “@email {%Email%} [😀 A thank-you gift for Community Leaders] ##communityleaderoffer
To use the automation, simply click the button on the back of your Trello card and your offer email will be sent!
Find out more about how to send emails with one click using Trello button automations.
Automate your next in-person event
Use the Email for Trello Power-Up to run a fully-digital and automated demo at your next conference or event! Capture leads, respond automatically with tailored information, and follow-up post-event – no extra tools needed.