How to set up a triage board in Trello
Transform your team’s productivity with a Trello triage board! Beat email overwhelm, effortlessly prioritize tasks, and restore calm to your daily operations.
If you’re a busy support desk or sales team collaborating in a shared inbox, it can be easy to slip into email overwhelm. And when everything seems urgent, it can be difficult to know what to do first!
Setting up a triage board in Trello can help you and your team prioritize your tasks and emails, restoring a sense of calm and purpose to your daily ops.
What is triage?
If you’ve ever watched a medical drama, you’ll know that triage refers to the prioritization of patients according to the urgency of the treatment they require. For productivity purposes, triage is a useful borrowed term as it allows teams to establish a set system for assessing how critical tasks are, ultimately leaving them in a better position to deal with those tasks more effectively.
How to use a Trello board to triage tasks
Managing a triage board in Trello involves three simple steps:
Emails arrive on your Trello board
Tasks are assessed for priority, scale and team
Tasks are resolved, and the process repeats again
Let’s take a closer look at each phase!
💡 This how-to assumes you’re using Trello to manage your day-to-day team tasks. So if you’re not familiar with Trello, check out our ultimate guide to getting set up in Trello and discover how to manage your business workflow in Trello.
1. Get your emails into Trello
If your team regularly collaborates in a shared inbox (like help@ or sales@), you’ll know that a lot of work tasks often start with plain old email! For example, if you receive customer support tickets via email, your team needs an efficient way to not only reply to requests, but also collaborate on the work needed to resolve the ticket.
The Email for Trello Power-Up solves this by connecting your inbox to Trello, so that your team can send, receive and collaborate on email, without ever leaving your Trello board.
💡 Want to learn more? Discover our top 10 ways to become a customer success hero in Trello. Manage your help tickets, email conversations and customer contacts in one central dashboard with the Email for Trello Power-Up.
Once your team is managing their tasks and emails in Trello, it’s time to apply some structure to organizing and prioritizing your cards, as this will form the basis of your triage board.
2. Assess and prioritize your tasks
On your Trello triage board, incoming tasks are assessed for priority (how urgent the work is), scale (the scope of the work that needs to be done) and team (whether the task can be resolved individually or if another team needs to get involved).
Based on the above criteria, most tasks will fall into one of three triage levels:
Level 1 requests are quick support cases that can be resolved with existing tools and documentation. For example, if a customer needs a password reset, an agent can direct them to the help database for further instructions.
Level 2 requests are cases in which an agent may need assistance or approval, but team collaboration can still resolve the issue. For example, if a customer has a billing query, an agent will be able to help once they have the relevant information from the finance department.
Level 3 requests represent issues or bugs. These are cases that need to be escalated to another team for investigation. For example, if a customer reports an app-related bug, a developer will need to look into a fix.
💡 When you’re assessing the urgency of tasks, Email for Trello’s built-in contact management notes can be super useful. By appending custom notes to a contact, team members can easily see priority clients or where there are SLAs in place that could affect the triage level of any given task.
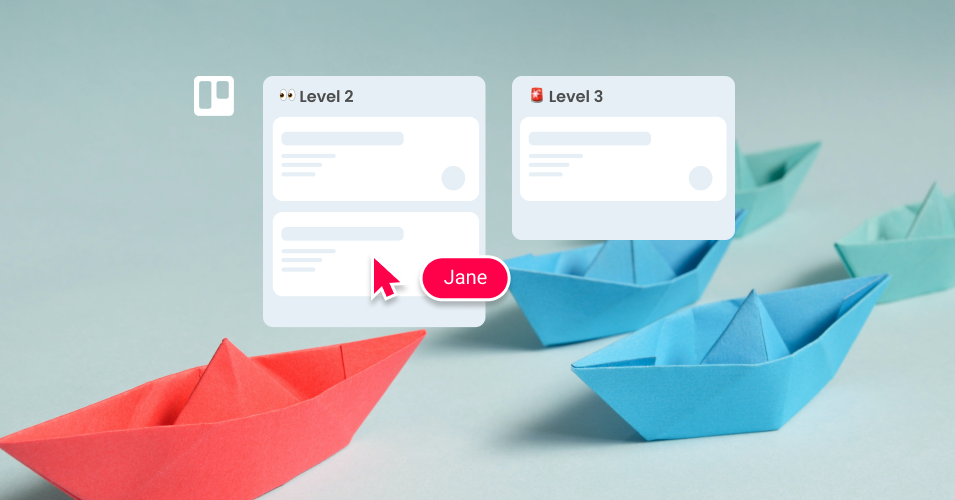
It’s useful to arrange your Trello lists to reflect each triage level, so that everyone can see the urgency of all tasks at a glance. Here’s an example layout for a triage board in Trello:

An example triage board in Trello, with cards in lists representing each triage level
3. Attend to your tasks
Once your tasks have been categorized, you can set up a clear process for dealing with each type, depending on what level it’s in.
Level 1: Resolve
Many requests like password resets or straightforward product questions can be dealt with by individual support agents. In these cases, it’s best to set up and send a Saved Reply – a template email that makes it quick and easy to reply to common questions.
For this type of repetitive work, it can be useful to set up a round-robin to assign cards to team members automatically. This way, you can automate card assignment for a specific list – for example, so that all cards in the level 1 list are assigned in turn. This makes the distribution of work fair, and makes sure no one gets saddled with all the grunt work!
Level 2: Get assistance
The great thing about Trello’s Kanban-style layout is that everyone can see at a glance which tasks are in which triage level. This gives team members the autonomy to pick up issues when they see them, making for a streamlined workflow where everybody takes responsibility and initiative for their own work.
For example, if the finance team is needed on an issue in the level 2 list, the customer support team don’t necessarily need to ask – the finance manager can easily see if there are cards in the list and jump in to help out.
💡 TIP You can customize the email notifications you receive in Trello. For example, when you receive a reply, set a label on the card or move it to the top of the current list. This is particularly useful if you’d like different notifications depending on the triage level or stage of the process work is in.
Level 3: Escalate
When you’re escalating an issue to another department, it’s important to keep your customer informed. Here’s how you can use Trello automation to help you maintain a high-level of customer service by automatically sending an escalation notification email:
Set up a new Saved Reply based on the triage level. In the body of the template email, let your customer know that their request is more complex than usual and is being handed to a specialised team.
Set up an automation to send your Saved Reply when you drag a card into the level 3 list.
Now, whenever a card is added to the evel 3 triage list, the customer will get an email update to say that their request is being escalated to a specialised team for investigation.
💡 Email for Trello can be used on multiple Trello boards, so when you’re escalating an issue to another department, you can move cards between your boards without breaking the email chain.
Power-Ups that play nicely with Email for Trello
Need extra functionality on your triage board? Give your workflow a boost with these Power-Up ideas:
Card Priority by Screenful offers customizable priority labels for your Trello cards. Simple, handy, and free!
The List Limits Power-Up Helps with realistic goals and assignment of tasks. Example of where we aim to have a max of 5 cards in a certain list.
Trello’s Voting Power-Up is useful for anything that needs team input or approval. See voting tallies per card at a glance.
Triage your tasks with Trello
Setting up a triage board in Trello with the Email for Trello Power-Up is a game changer for busy teams. With clear triage levels and automated processes, a triage board can help you navigate urgent tasks with ease, ensuring a more organized and productive workflow.